This project will never become a cache, even not a US-German joint one. So the first (very clever) question is, why I’m publishing it here. The reason is very easy. It’s an Arduino project and I’m learning a lot - maybe for next caches???
Introduction:
While my wife is the head of a nursery (in German „Kindergarten“), I’m the chairman of the board on a voluntary basis. Since years our staff has to do the time keeping on an Excel sheet. But in a nursery that’s quite complicated. While a „normal“ worker have only 2 kinds of time (working or not working), at a nursery there’re some more:
- Child (C): The time the nurse it working with the children
- Preparation (P): The time the nurse is preparing or wrapping up the work with the children
- Deputizing (D): Like C but separate from her usual time table when deputizing absent colleagues (vacation, illness…)
- Leading(L): The time the head of the nursery needs to manage the institution
Our instituition became quite large after a last expansion last year. Now the size is like this:
- 3 x nursery groups (age 1-3) with 15 children each - open 8:00 - 16:00 (07:00 - 08:00 & 16:00 - 18:00 on demand)
- 1 mixed group (age 1-6) with 19 children each - open 8:00 - 16:00 (07:00 - 08:00 & 16:00 - 18:00 on demand)
- 1 x morning group (age 3-6) with 25 children each - open 07:30 - 12:30 (07:00 - 07:30 & lunch 12:30 - 14:00 ony demand)
- 1 x afternoon group (age 3-6) with 25 children each - open 14:00 - 18:00 (lunch 12:30 - 14:00 on demand)
- 1 x full day group (age 3-6) with 25 children each - open 08:00 - 16:00 (07:00 - 08:00 & 16:00 - 18:00 demand)
More about „our" nursery (in German) you can find here (yes, the internet page is also done by me!)...
Back to the time keeping…
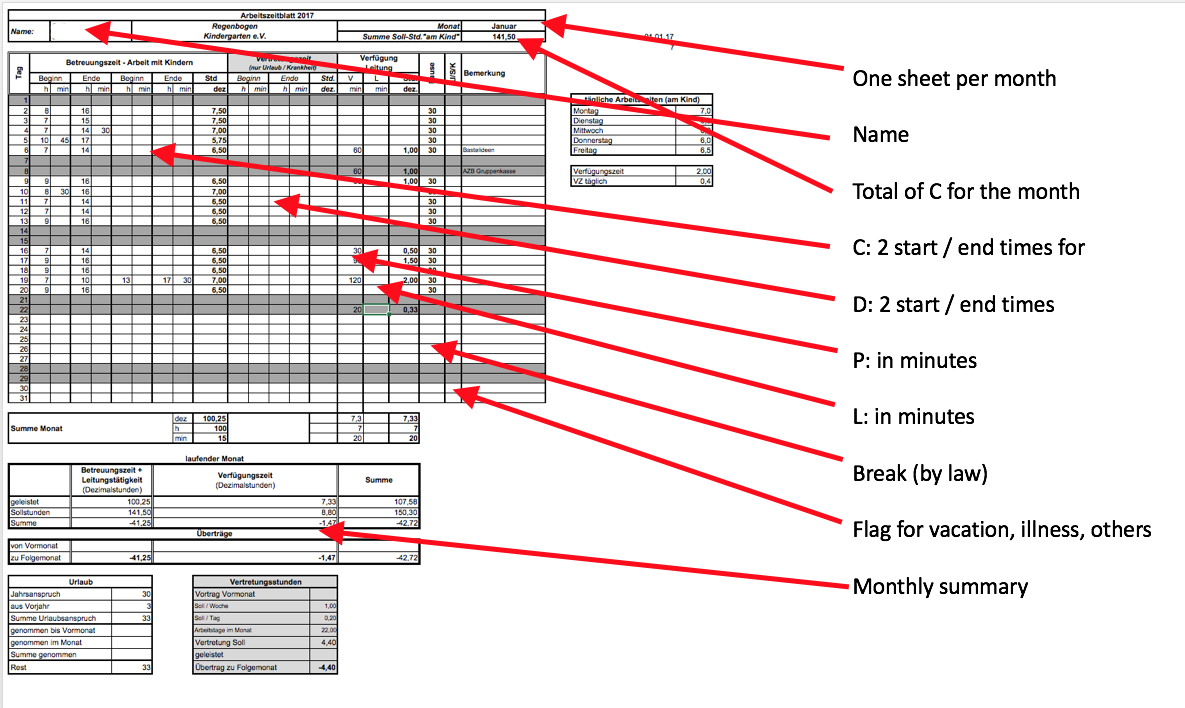
All done in Excel and quite complicated, but all time keeping to be done „by hand“...
The target of the project
Since more than 2 years we asked Dr. Google to show us an electronic time keeping system. They aren’t expensive, but at the end you have cards for each employee being stamped. No chance to have the data inside the Excel sheets. For sure an electronic transfer to a HR system is offered for larger companies, but that would be too expensive for us. In addition no time keeping system is dealing with so many different kinds of working time.
When I complained about again to a colleague of mine, he answered „Why don’t you build it by yourself, based on an Arduino?“. And my answer was „Yes, why not?“
Im still doing a feasibility study. But in parallel I’m working already on some test sketches to discover if a) this would be feasible and b) for me.
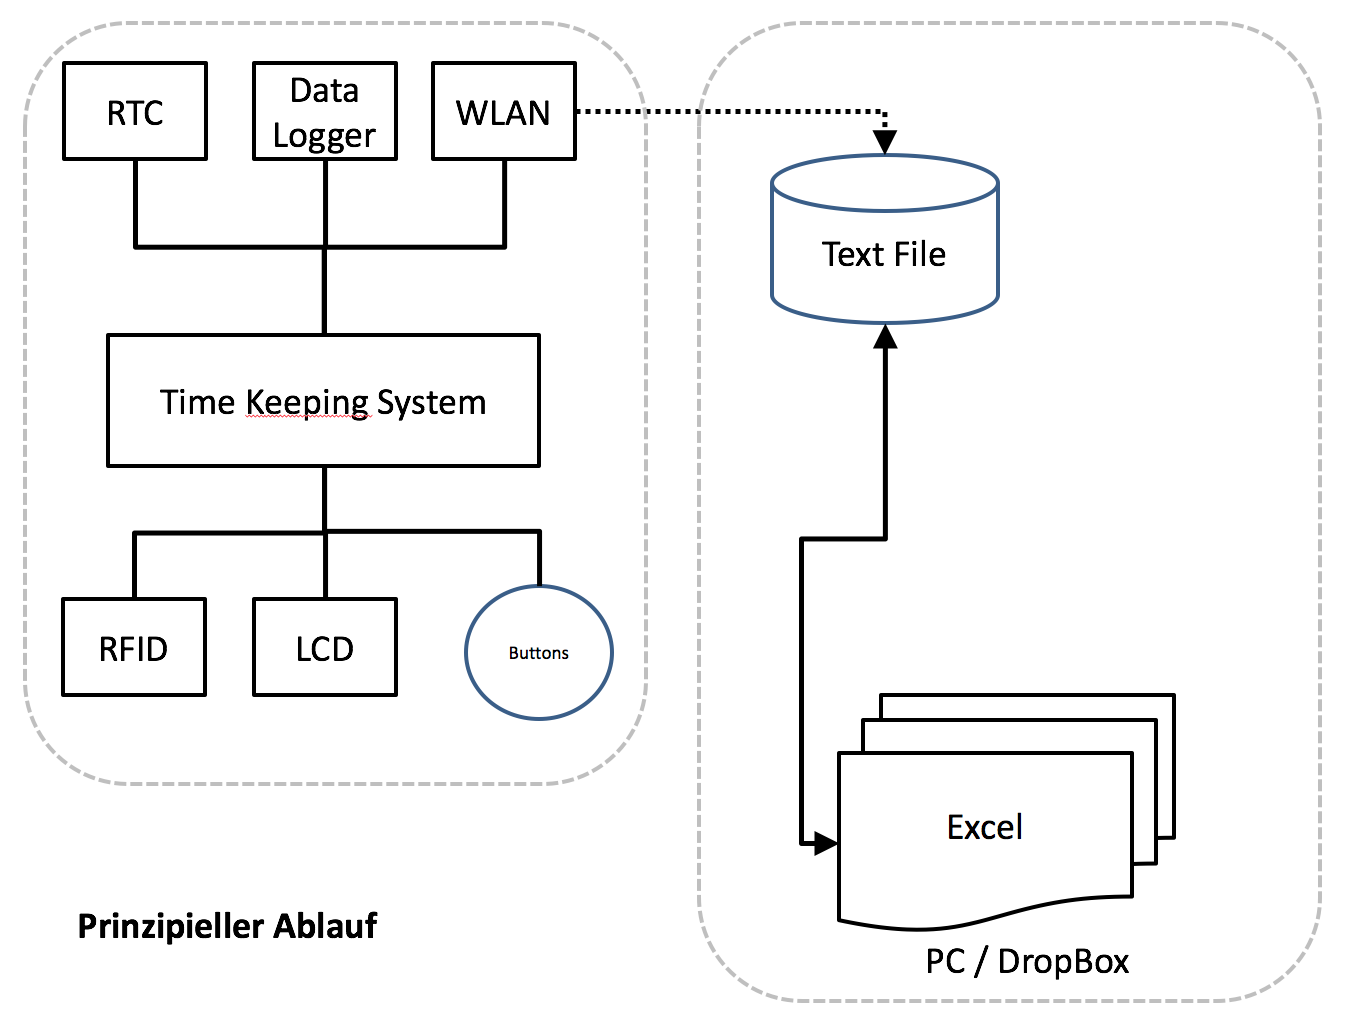
This is the main concept:
- The C and D times should be stamped, while P and L will still be done by hand (no need to stay at the nursery for that times)
- Vacation also filled by hand
- The system must read the actual time from a NTP time server at least each morning at roughly 03:30 to set the clock to DST and winter time or when the internal time from the real time clock (RTC) seems to be messy
- The employee has to stamp the time when coming and going and to determine the kind (C or D).
- If the employee is changing from one kind of time to another, he has to stamp out and in again.
- The employee is identified by an RFID card he has to put in front of the system
- The system is writing the stamped times to a file (SD card on the data logger)
- Every morning (just after midnight) the system is sending the data file via WiFi (WLAN) to a cloud
- When an employee is opening his Excel file, the data will updated by the file sent from the Arduino
The main parts of the system are like that:
I’ll inform about my way ahead here in future….
Update 1/22/2017
This is the status of today after working for roughly one week from time to time on this project:
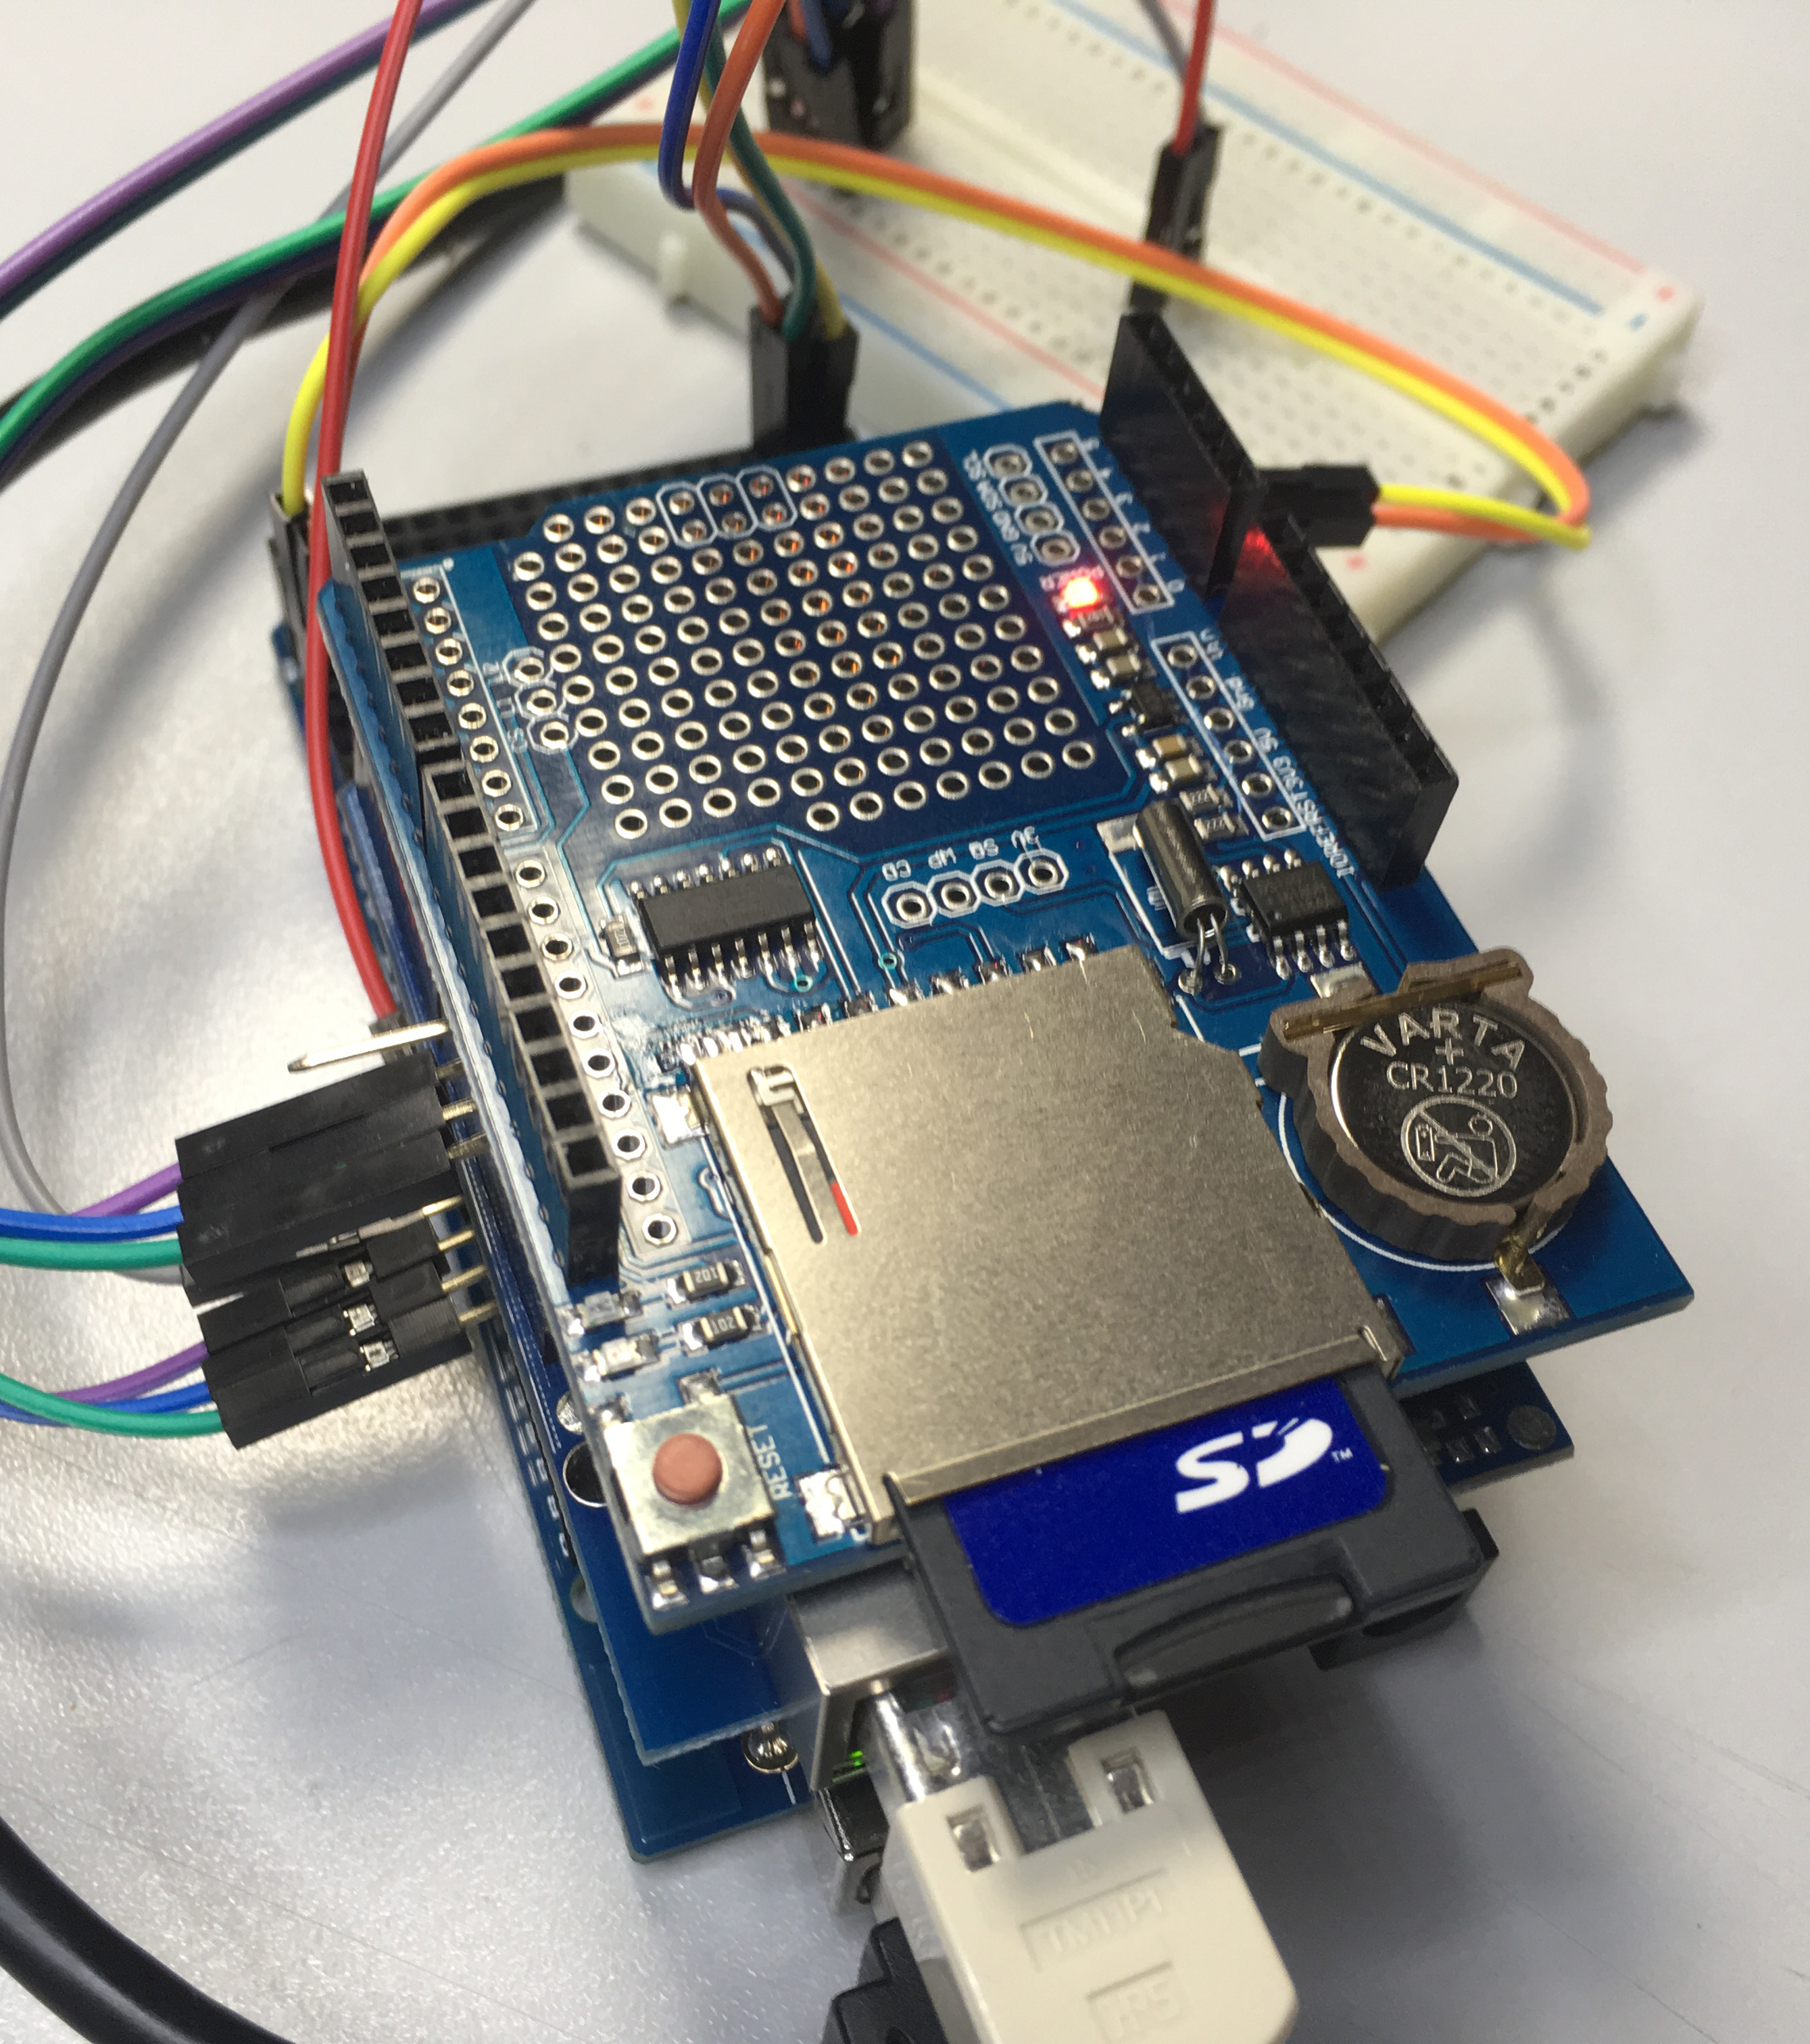
First I’ve bought a Data Logger Shield with an RTC onboard:
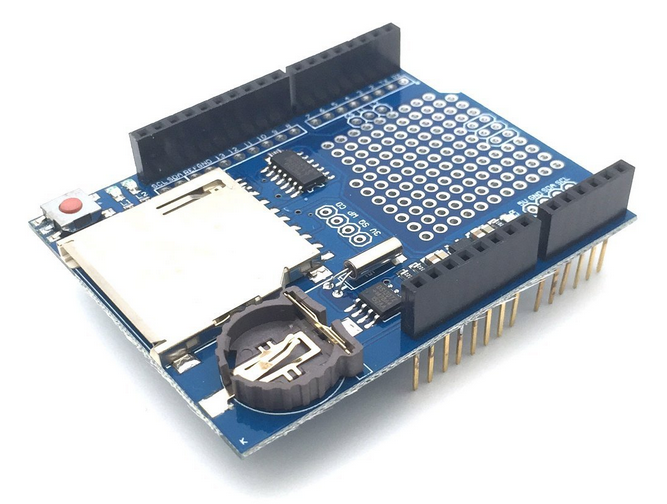
It took a lot of time to get it working with a Mega, because the pins of the Serial Peripherical Interface (SPI) are different with an Uno and a Mega. After a lot of try on error I got it working. Even not so easy was, to buy the battery for the RTC. It’s a CR1210 and no store in town offered it. At the end I had to order it from Amazon.
My next step was to include a WiFi module but even soldering of this one ended up in a disaster:
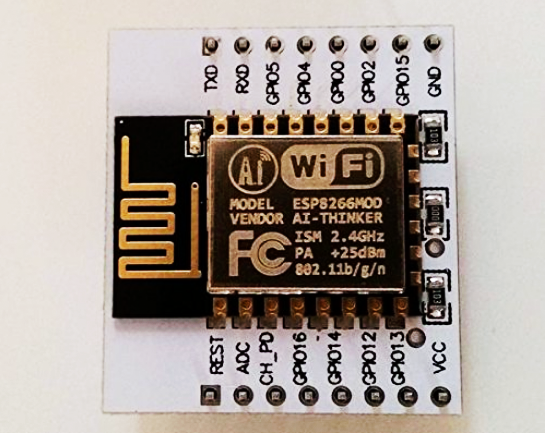
So I tried this one:
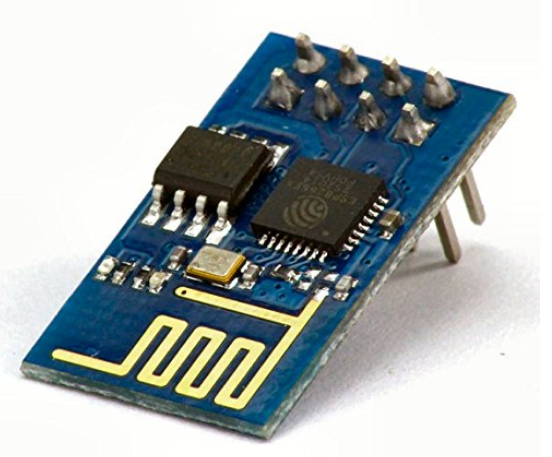
But this ESP8266 (on top an ESP12-F, below an ESP1) isn’t a breakout only. It’s a complete microprocessor by itself. All this for only some few Euros / USD. But, I didn’t got it working. My birthday isn’t so far and so I put some books about that on my wish list. I wasn’t aware that I just stepped into a new topic called „IoT: Internet of Things“… I decided, to put the WiFi part on hold because an Ethernet shield could be an alternative and I got it working already.
This weekend I needed hours to learn how to work with more than 1 device connected to the SPI bus. At this moment it’s are 2: The Ethernet shield and the data logger with the SD card are both communicating using SPI. At the end I got it working and took this pictures:
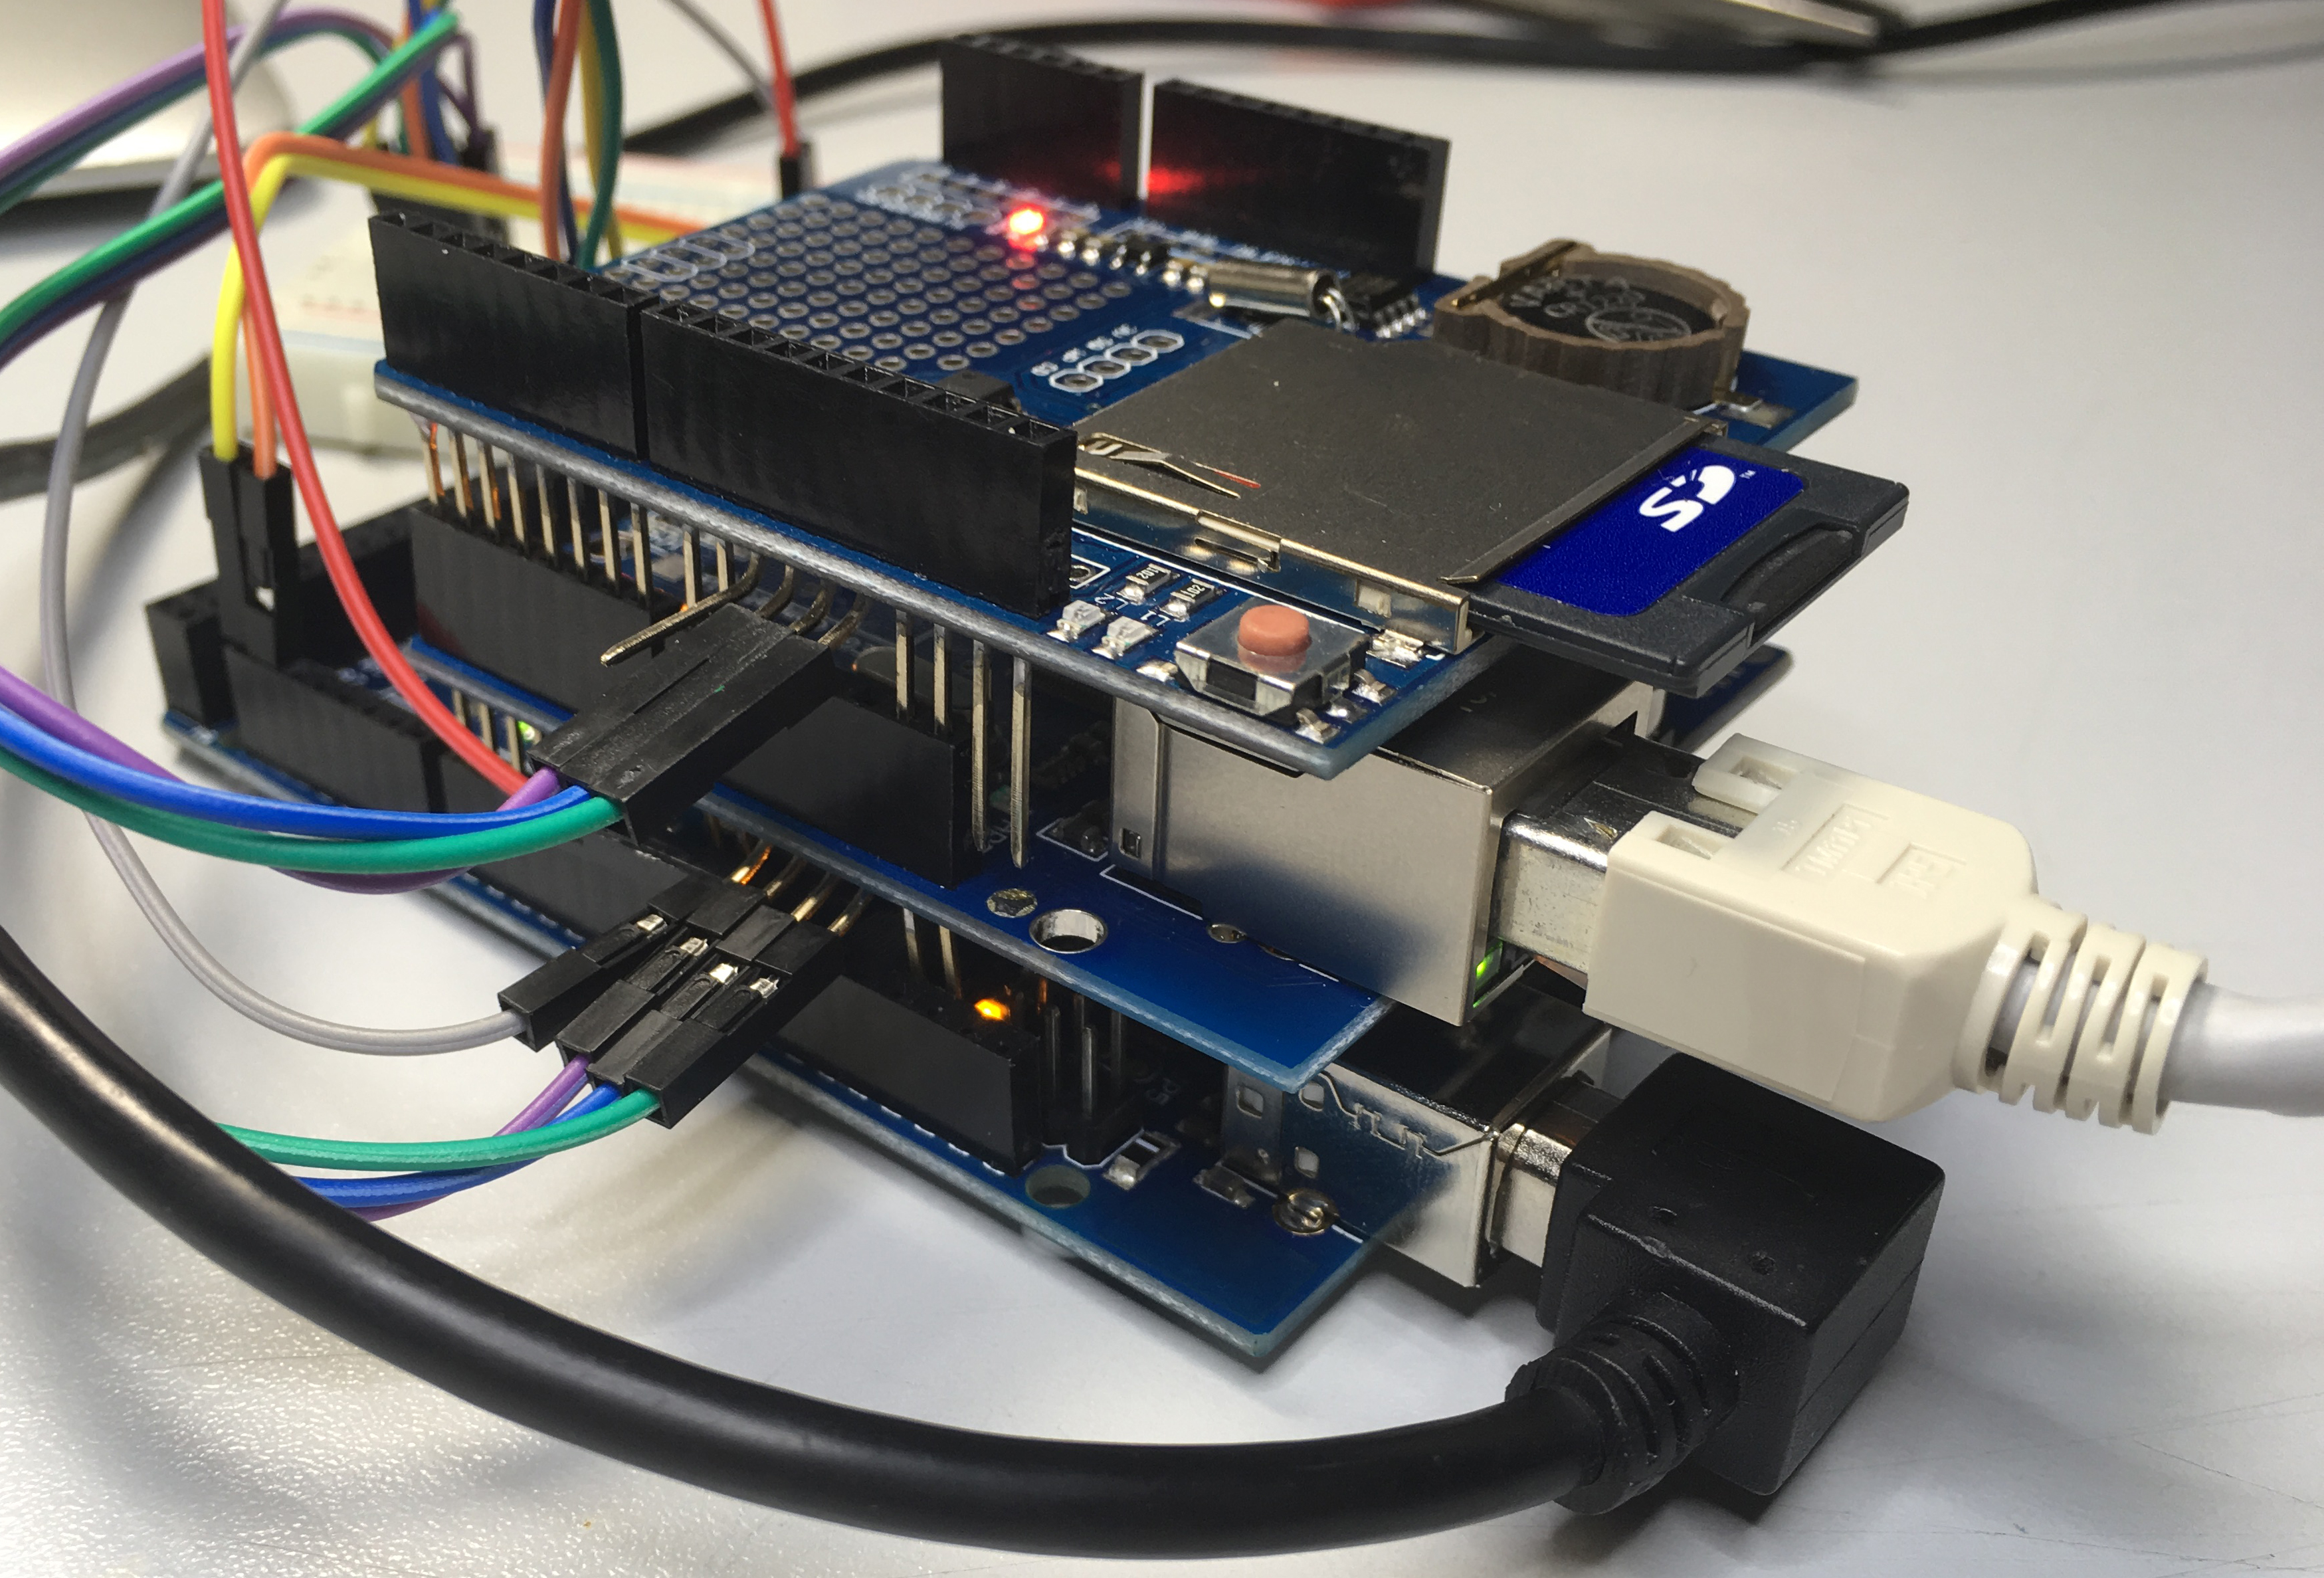
You can see on both pictures the pins, I had to bend because the pins on the Mega are different as on an Uno.
Update 1/24/2017
In the meantime I worked on 2 topics:
First was, to include the RFID reader into the hardware and the software. I struggeled for hours and sorted out a lot of errors and bugs. At the end I got it working, but unfortunately not stable. Sometimes the card was read, most of the times not. I checked the wiring at least 1000 times and tried everything. At the end I discovered that the pins of the RFID reader didn’t had good contacts into the breadboard. I wired them with jumper cables to the breadboard and suddenly everything went well. Grrrrmmmmpppppffffff….
All this I did without the two other shieds (Ethernet and data logger with RTC) connected to the Mega. So the next step was to bring all together. Great luck: It seems I understand the control of the different (3) devices conected to the SPI bus. It worked on the first attempt.
The second topic was my thinking about how to send the data from the SD card of the Arduino to a PC. Best would be to send them directly to DropBox inside the internet. This would have the advantage not to have a PC running all the time to which the file would be sent. This will become the „k.o. factor“ of this project. Dr. Google offered some links, but except one they’re all based on the Arduino Yun. This is a quite special board:
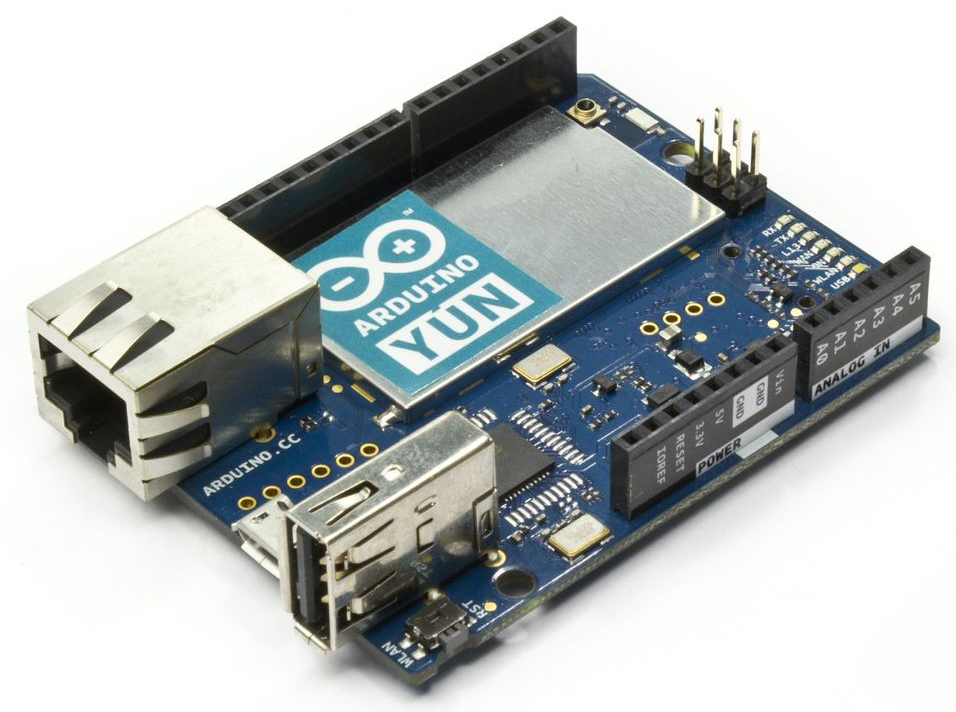
- combining an Arduino with a LINUX computer
- having Ethernet and WLAN on board
- but being very expensive (the original)
- no Chineese clones offered and (main concern)
- much less memory as the Mega (precisely even less than an Uno)
Meanwhile I cancelled the idea with a WLAN connection. More precise, I’ve put it on hold. If I’ll fail with WLAN, I’ll go on with Ethernet via cable. I just discovered in the nursery yesterday that it won’t be difficult to have an Ethernet and power cabling from the office of Tina (my wife, leading the nursery) to the wall I decided to be the place for the time keeping system.
What next? I’ll investigate a way to transfer the data from the SD card of the Arduino more or less automatically to DropBox. I’m pretty sure that will take some time…
The Nursery project became a Raspberry Pi project… Move to here...